🚀 Spring Boot Learning Journey: From Beginner to Full-Stack Java Developer
🚀 Spring Boot Journey #01: Building a Student Management REST API with Spring Boot, MySQL & Spring Data JPA

🚀 Spring Boot Journey #06: Building a Student Management REST API with Spring Boot, MySQL & Spring Data JPA
Part of my Spring Boot learning journey, where I build real-world backend projects and share everything I learn along the way.
👋 Introduction
Hello Developers! 👋
Welcome back to another article in my Spring Boot Learning Journey.
As I continue learning Spring Boot, I don't want to just watch tutorials or read documentation—I want to build real projects that help me understand how backend applications work in the real world.
That's why I decided to build a Student Management REST API.
This project may look simple, but while building it, I learned many important backend concepts such as:
Creating REST APIs
Connecting Spring Boot with MySQL
Understanding Layered Architecture
Using Spring Data JPA
Performing CRUD Operations
Testing APIs using Postman
Returning proper HTTP Status Codes
Understanding Soft Delete and Hard Delete
Instead of keeping my notes private, I'm sharing everything I learn so that beginners like me can learn faster.
If you're just starting Spring Boot, this article is for you.
📌 Project Overview
The Student Management REST API is a backend application that allows users to perform CRUD (Create, Read, Update, Delete) operations on student data.
Instead of building a frontend first, I focused completely on understanding backend development.
The application receives HTTP requests from Postman, processes the request inside Spring Boot, performs database operations using Spring Data JPA, and returns JSON responses.
Throughout this project, I followed the Controller → Service → Repository (C-S-R) architecture, which is commonly used in professional Spring Boot applications.
🎯 Project Features
✔ Create Student
✔ Get All Students
✔ Get Student by ID
✔ Update Student Details
✔ Delete Student
✔ Soft Delete Support
✔ JSON Request & Response
✔ ResponseEntity
✔ Layered Architecture
✔ MySQL Database Integration
✔ Spring Data JPA
✔ API Testing using Postman
💻 Tech Stack
Java
Spring Boot
Spring Data JPA (Hibernate)
MySQL
Maven
Postman
🤔 Why I Built This Project?
Learning becomes much easier when we apply concepts in a real project.
Instead of memorizing annotations or APIs, I wanted to understand:
How requests travel inside a Spring Boot application.
How Spring Boot connects to MySQL.
How Spring Data JPA works.
How REST APIs are created.
How professional backend projects are structured.
This project gave me practical experience with all of these concepts.
In the next section, we'll understand the project structure and how Controller, Service, and Repository work together.
📂 Project Structure
One of the first things I noticed while learning Spring Boot was that every project follows a specific folder structure. At first, it looked confusing, but after building this project, I understood why each folder exists.
Here's the structure of my Student Management REST API project:
src
└── main
    ├── java
    │   └── me.satyajitmishra
    │       └── CRUDSpringBootProject_1
    │           ├── controller
    │           │      StudentController.java
    │           │
    │           ├── services
    │           │      StudentService.java
    │           │
    │           ├── repository
    │           │      StudentRepository.java
    │           │
    │           ├── entity
    │           │      Student.java
    │           │
    │           └── CRUDSpringBootProject1Application.java
    │
    └── resources
        ├── application.properties
        └── static
Although there are many folders inside a Spring Boot project, these are the ones I used while building my CRUD application.
📁 Understanding Each Folder
📌 Entity Package
The Entity package contains the Java classes that represent our database tables.
In my project, I created a Student class.
@Entity
public class Student {

    @Id
    @GeneratedValue(strategy = GenerationType.IDENTITY)
    private Long id;

    private String name;

    private String email;

}
When Spring Boot starts, it reads this class and automatically creates a matching table inside the MySQL database.
Simply put,
One Entity Class = One Database Table
This is one of the most useful features provided by Spring Data JPA.
📌 Repository Package
The Repository layer is responsible for communicating with the database.
Instead of writing SQL queries manually, Spring Data JPA provides ready-made methods like:
- save()
- findById()
- findAll()
- delete()
My repository is very simple.
public interface StudentRepository extends JpaRepository<Student, Long> {

}
By extending JpaRepository, Spring Boot automatically provides all basic CRUD operations.
This means I don't need to write SQL for inserting, updating, deleting, or fetching data.
📌 Service Package
The Service layer contains the business logic of the application.
Many beginners ask,
"Why not call Repository directly from the Controller?"
The answer is simple.
The Controller should only handle HTTP requests.
The Service should decide what business logic needs to be executed.
For example,
When a client requests to update a student,
The Controller receives the request,
The Service checks whether the student exists,
Then it updates the required fields,
Finally, it asks the Repository to save the changes.
Keeping business logic inside the Service layer makes the project clean and easier to maintain.
📌 Controller Package
The Controller acts as the entry point of our application.
Whenever a client (like Postman or a frontend application) sends an HTTP request, it is received by the Controller.
Example:
@PostMapping("/create")
This endpoint tells Spring Boot,
"When someone sends a POST request to /create, execute this method."
Similarly,
@GetMapping
handles GET requests,
@PutMapping
handles update requests,
and
@DeleteMapping
handles delete requests.
The Controller does not interact with the database directly.
Instead, it calls the Service layer.
🏗️ Controller → Service → Repository Architecture
This project follows one of the most commonly used architectures in Spring Boot.
          Client (Postman)

                 │

                 ▼

         StudentController

                 │

                 ▼

          StudentService

                 │

                 ▼

      StudentRepository

                 │

                 ▼

          MySQL Database
Let's understand this flow step by step.
Step 1
The client sends an HTTP request using Postman.
For example,
POST /api/students/create
Step 2
The request reaches the Controller.
The Controller accepts the request body and passes it to the Service layer.
Step 3
The Service performs all business logic.
Examples:
- Validate data
- Check whether the student exists
- Prepare the object
- Decide what should happen next
Step 4
The Service calls the Repository.
The Repository communicates with MySQL using Spring Data JPA.
Step 5
The Repository returns the result.
The Service processes it if needed.
Finally,
The Controller returns a JSON response to the client.
💡 Why is this Architecture Important?
Separating responsibilities makes the application easier to understand and maintain.
- Controller → Handles HTTP Requests
- Service → Handles Business Logic
- Repository → Handles Database Operations
- Entity → Represents Database Tables
This separation follows the Single Responsibility Principle, making the code cleaner and more scalable as the project grows.
🚀 What's Next?
Now that we understand the project structure and architecture, the next part will explain how to connect Spring Boot with MySQL, configure application.properties, and understand how the Entity class maps to a database table.
🔗 Connecting Spring Boot with MySQL
Until now, our project only contained Java classes.
But where will the student data be stored?
The answer is MySQL.
A database allows us to store data permanently. Even if we stop or restart our application, the data remains safe inside the database.
Spring Boot makes connecting with MySQL very simple. We only need to configure a few properties inside the application.properties file.
📂 What is application.properties?
The application.properties file is the central configuration file of a Spring Boot application.
Instead of hardcoding values like database URL, username, or password inside Java classes, we keep them here.
This approach is called Externalized Configuration.
It makes the application easier to maintain and more secure.
You can find this file here:
src
└── main
    └── resources
        └── application.properties
⚙️ MySQL Configuration
Below is a typical configuration used to connect Spring Boot with MySQL.
spring.datasource.url=jdbc:mysql://localhost:3306/studentdb

spring.datasource.username=root

spring.datasource.password=your_password

spring.datasource.driver-class-name=com.mysql.cj.jdbc.Driver

spring.jpa.hibernate.ddl-auto=update

spring.jpa.show-sql=true

spring.jpa.properties.hibernate.format_sql=true
Let's understand what each property does.
📌 spring.datasource.url
spring.datasource.url=jdbc:mysql://localhost:3306/studentdb
This tells Spring Boot:
- Which database to connect to.
- Which port MySQL is running on.
- Which database name should be used.
Breaking it down:
jdbc→ Java Database Connectivitymysql→ Database typelocalhost→ Database is running on your own computer3306→ Default MySQL portstudentdb→ Database name
📌 spring.datasource.username
spring.datasource.username=root
This is the username used to log in to MySQL.
For many local installations, the default username is root.
📌 spring.datasource.password
spring.datasource.password=your_password
This is your MySQL password.
⚠️ Important: Never upload your real database password to GitHub. Add application.properties to your .gitignore file or use environment variables for sensitive information.
📌 spring.datasource.driver-class-name
spring.datasource.driver-class-name=com.mysql.cj.jdbc.Driver
This tells Spring Boot which JDBC driver should be used to communicate with MySQL.
Usually, Spring Boot detects this automatically if the MySQL dependency is added, but explicitly specifying it is also fine.
📌 spring.jpa.hibernate.ddl-auto
spring.jpa.hibernate.ddl-auto=update
This is one of the most important properties.
It controls what Hibernate should do with your database tables when the application starts.
Some common values are:
| Value | Description |
|---|---|
create |
Deletes existing tables and creates new ones every time the application starts. |
create-drop |
Creates tables when the application starts and deletes them when it stops. |
update |
Updates the table structure without deleting existing data. |
validate |
Checks whether the database matches your Entity classes. |
none |
Hibernate does not perform any table management. |
During development, I used:
spring.jpa.hibernate.ddl-auto=update
This automatically updates the table whenever I add a new field to my Entity class without losing existing data.
📌 spring.jpa.show-sql
spring.jpa.show-sql=true
This prints every SQL query executed by Hibernate in the console.
Example:
insert into student(name,email)
values(?,?)
This is very helpful while debugging.
📌 spring.jpa.properties.hibernate.format_sql
spring.jpa.properties.hibernate.format_sql=true
This formats SQL queries in a readable way.
Without it:
select*fromstudentwhereid=?
With formatting:
select
    *
from
    student
where
    id=?
Much easier to read!
🧩 How Does Spring Boot Know Which Table to Create?
This is where Entity classes come into the picture.
My project contains a Student entity.
@Entity
public class Student {

    @Id
    @GeneratedValue(strategy = GenerationType.IDENTITY)
    private Long id;

    private String name;

    private String email;
}
When Spring Boot starts:
- It scans all classes annotated with
@Entity. - Hibernate reads the fields.
- It generates the SQL required to create the table.
- The table is created automatically (if it doesn't already exist).
🗄️ How Entity Maps to a Database Table
The mapping is straightforward:
| Java Entity | MySQL Table |
|---|---|
| Student | student |
| id | id |
| name | name |
In simple words:
One Entity class becomes one database table, and each field becomes a column.
🔄 What Happens When the Application Starts?
Let's understand the startup process.
Spring Boot Starts
        │
        ▼
Reads application.properties
        │
        ▼
Connects to MySQL
        │
        ▼
Scans @Entity Classes
        │
        ▼
Creates/Updates Tables
        │
        ▼
Application Ready 🚀
Everything happens automatically.
This is one of the biggest reasons why Spring Boot is so popular—it removes a lot of manual configuration.
💡 Key Takeaways
✅ application.properties stores application configuration.
✅ Spring Boot connects to MySQL using the datasource properties.
✅ Hibernate automatically maps Entity classes to database tables.
✅ ddl-auto=update keeps the database schema synchronized during development.
✅ show-sql=true helps us see the generated SQL queries.
🚀 What's Next?
Now that our application is connected to MySQL and the database is ready, it's time to build the core of the project.
In the next part, we'll understand how Spring Data JPA Repository works, why we extend JpaRepository, and how CRUD operations happen without writing SQL queries.
📦 Understanding Spring Data JPA Repository
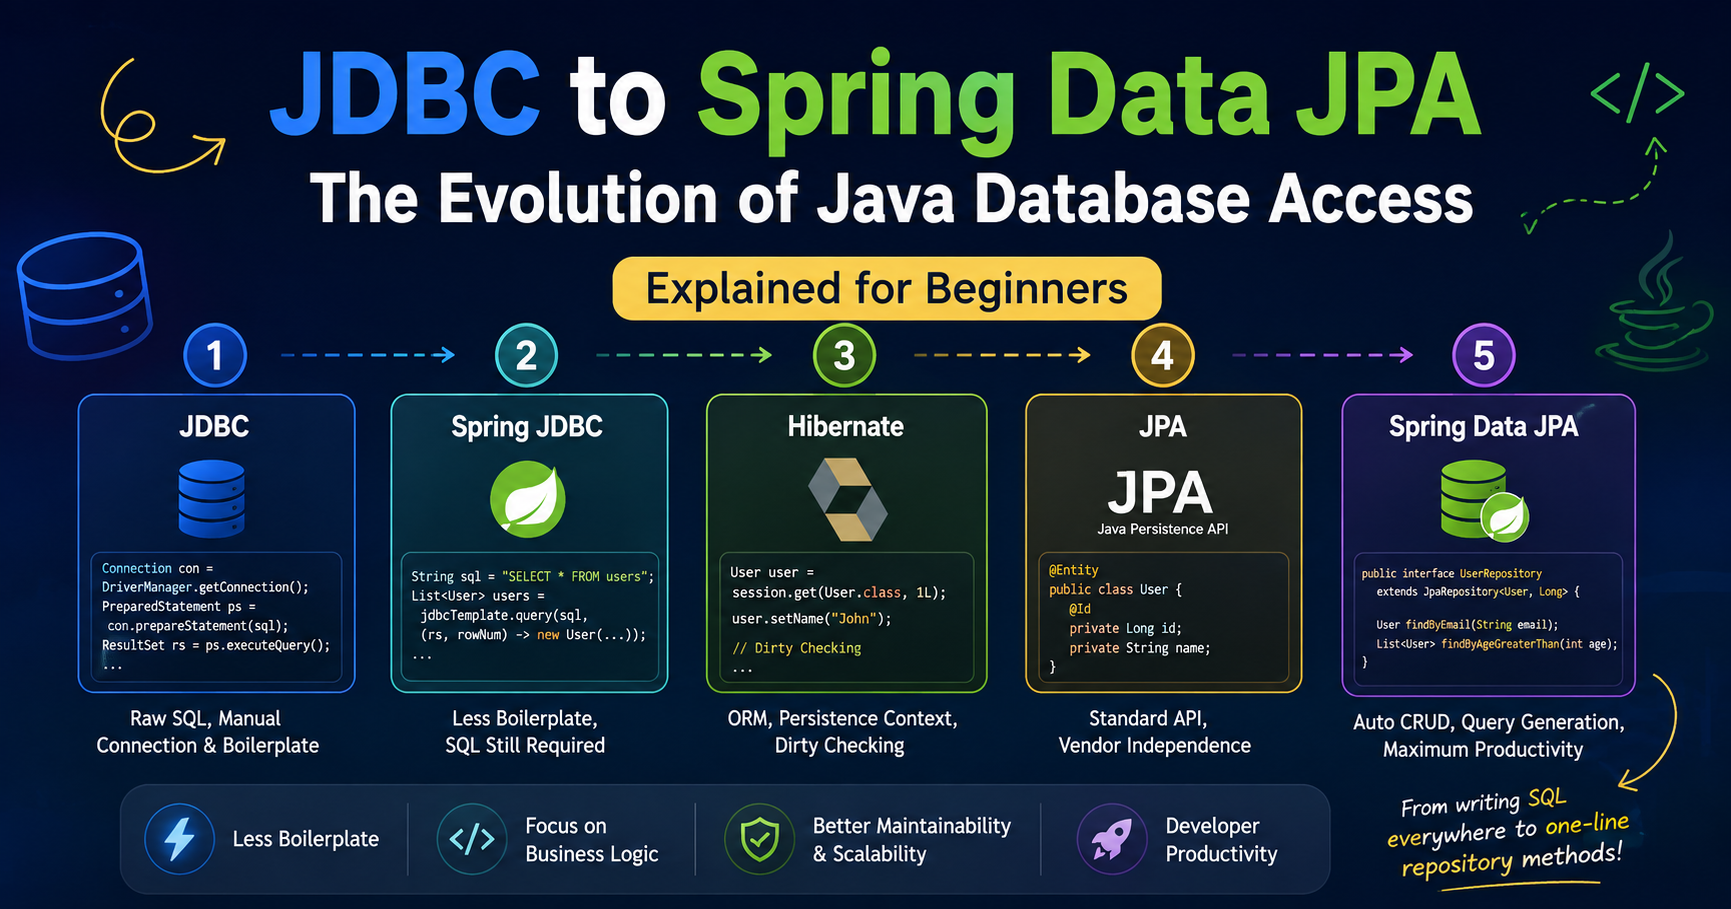
If you've worked with JDBC before, you know that performing database operations usually requires writing SQL queries manually.
For example, to insert a student, you would write something like:
INSERT INTO student(name, email)
VALUES('John', 'john@gmail.com');
Similarly, for fetching data:
SELECT * FROM student;
Updating data:
UPDATE student
SET name='David'
WHERE id=1;
Deleting data:
DELETE FROM student
WHERE id=1;
As the project grows, writing SQL for every operation becomes repetitive and time-consuming.
This is where Spring Data JPA makes life much easier.
🤔 What is Spring Data JPA?
Spring Data JPA is a Spring Boot module that simplifies database operations.
Instead of writing SQL queries manually, we simply write Java code, and Spring Boot automatically generates the required SQL behind the scenes.
This saves time, reduces boilerplate code, and makes applications easier to maintain.
📌 What is a Repository?
A Repository acts as the bridge between our Java application and the database.
Its main responsibility is to:
- Insert data
- Fetch data
- Update data
- Delete data
The Controller never talks directly to the database.
Instead, the flow is:
Controller
      │
      ▼
Service
      │
      ▼
Repository
      │
      ▼
Database
This keeps our application clean and organized.
🏗️ Creating the Repository
Creating a repository in Spring Boot is surprisingly simple.
package me.satyajitmishra.CRUDSpringBootProject_1.repository;

import me.satyajitmishra.CRUDSpringBootProject_1.entity.Student;
import org.springframework.data.jpa.repository.JpaRepository;

public interface StudentRepository
        extends JpaRepository<Student, Long> {

}
That's it!
There is no implementation class.
No SQL queries.
No JDBC code.
No Connection objects.
Spring Boot creates everything automatically.
🤔 What Does JpaRepository Mean?
Let's understand this line carefully.
JpaRepository<Student, Long>
It contains two generic parameters.
<Student, Long>
Student
This tells Spring Boot:
"Manage the Student Entity."
Long
This tells Spring Boot:
"The primary key (ID) type of Student is Long."
Since my Student entity looks like this:
@Id
@GeneratedValue(strategy = GenerationType.IDENTITY)
private Long id;
the Repository becomes:
JpaRepository<Student, Long>
🚀 Built-in CRUD Methods
The biggest advantage of JpaRepository is that it already provides many useful methods.
Without writing any code, we can use:
Save
studentRepository.save(student);
Purpose:
- Insert new record
- Update existing record
Spring Boot automatically decides whether it should perform an INSERT or UPDATE.
Find All
studentRepository.findAll();
Returns
List<Student>
Equivalent SQL:
SELECT * FROM student;
Find By ID
studentRepository.findById(id);
Returns
Optional<Student>
Equivalent SQL:
SELECT *
FROM student
WHERE id=?
Delete
studentRepository.delete(student);
Equivalent SQL:
DELETE
FROM student
WHERE id=?
Exists
studentRepository.existsById(id);
Returns
true
or
false
Useful before updating or deleting data.
🤔 Why Does findById() Return Optional?
One question I had while learning was:
Why doesn't
findById()simply return a Student?
The reason is simple.
Imagine we search for:
Student ID = 100
but no student exists with that ID.
Returning null could easily lead to a NullPointerException.
Instead, Spring Boot returns:
Optional<Student>
This forces us to check whether the data exists before using it.
Example:
Optional<Student> student =
studentRepository.findById(id);

if(student.isPresent()){

    return student.get();

}
This makes our application much safer.
🏗️ Repository in My Project
Whenever I wanted to save a student, my Service layer simply called:
studentRepository.save(student);
To fetch all students:
studentRepository.findAll();
To fetch a single student:
studentRepository.findById(id);
To delete a student:
studentRepository.delete(student);
Notice something interesting.
I never wrote a single SQL query.
Spring Data JPA generated everything automatically.
🔄 Complete Flow
Let's understand what happens when we create a student.
POST Request

        │

        ▼

Controller

        │

        ▼

Service

        │

        ▼

studentRepository.save(student)

        │

        ▼

Hibernate

        │

        ▼

Generated SQL

        │

        ▼

INSERT INTO student(...)

        │

        ▼

MySQL Database
Everything happens automatically behind the scenes.
This is one of the biggest reasons why Spring Boot is loved by developers.
💡 Advantages of Spring Data JPA
✔ No manual SQL for basic CRUD
✔ Less boilerplate code
✔ Cleaner project structure
✔ Faster development
✔ Easy to maintain
✔ Production-ready architecture
✔ Easy integration with Hibernate
📚 Key Takeaways
- Repository is responsible for communicating with the database.
JpaRepositoryprovides built-in CRUD methods.save()is used for both Insert and Update.findById()returns an Optional to avoid NullPointerException.- Spring Data JPA generates SQL automatically.
- We can build complete CRUD applications without writing basic SQL queries.
🚀 What's Next?
Now that we understand how the Repository works, it's time to move to the Service Layer.
In the next part, we'll learn why the Service layer is important, how business logic is implemented, and how CRUD operations are handled before interacting with the database.
🧠 Understanding the Service Layer in Spring Boot
In the previous part, we learned how the Repository communicates with the database using Spring Data JPA.
Now let's move to another important layer in a Spring Boot application — the Service Layer.
Many beginners ask:
"If the Repository already performs CRUD operations, why do we need a Service layer?"
That's a great question.
The answer is simple:
The Service layer contains the business logic of our application.
Instead of writing all the logic inside the Controller, we move it to the Service class to keep our code clean, reusable, and easier to maintain.
📌 Why Do We Need a Service Layer?
Imagine your application is growing.
Today, you only need to save student information.
Tomorrow, you might need to:
- Validate email addresses
- Check if a student already exists
- Send a welcome email
- Generate a student ID
- Save logs
- Handle exceptions
If all of this logic is written inside the Controller, the code quickly becomes messy.
That's why we separate responsibilities.
- Controller → Handles HTTP requests.
- Service → Handles business logic.
- Repository → Handles database operations.
This separation makes the application cleaner and easier to scale.
🏗️ Service Flow
The flow of a request looks like this:
Client (Postman)

        │

        ▼

StudentController

        │

        ▼

StudentService

        │

        ▼

StudentRepository

        │

        ▼

MySQL Database
The Controller never communicates directly with the database.
Everything passes through the Service layer.
📌 Dependency Injection
To use the Repository inside the Service class, we inject it.
@Service
public class StudentService {

    private final StudentRepository studentRepository;

    public StudentService(StudentRepository studentRepository) {
        this.studentRepository = studentRepository;
    }

}
This is called Constructor Dependency Injection.
Spring Boot automatically creates the Repository object and provides it to the Service class.
This is cleaner and recommended over field injection.
✨ Creating a Student
Let's look at the first CRUD operation.
public Student createStudent(Student student){

    return studentRepository.save(student);

}
What happens here?
Step 1
The Controller receives a POST request.
POST /api/students/create
Step 2
The request body is converted into a Student object.
Step 3
The Controller calls
studentService.createStudent(student);
Step 4
The Service calls
studentRepository.save(student);
Step 5
Spring Data JPA generates the SQL query.
INSERT INTO student(...)
VALUES(...)
Step 6
The new student is stored inside MySQL.
📖 Reading One Student
Your Service method looks like this:
public Student getStudent(Long id){

    Optional<Student> student =
            studentRepository.findById(id);

    if(student.isPresent()){

        return student.get();

    }

    return null;

}
Let's understand it.
The Repository searches the database.
studentRepository.findById(id)
Since the student may or may not exist, Spring Boot returns an Optional<Student>.
If the student exists,
return student.get();
Otherwise,
return null;
In larger applications, we usually throw a custom exception instead of returning null, but this approach is good for beginners.
📚 Reading All Students
Getting all records is very simple.
public List<Student> getAllStudents(){

    return studentRepository.findAll();

}
The Repository automatically executes
SELECT *
FROM student;
and returns all students as a list.
✏️ Updating a Student
Updating data is slightly different from creating data.
We first check whether the student exists.
Optional<Student> existingStudent =
        studentRepository.findById(id);
If no student is found,
return null;
Otherwise,
we update the object and save it again.
studentRepository.save(student);
An important thing to remember:
The same
save()method is used for both Insert and Update.
Spring Data JPA decides automatically whether it should perform an INSERT or an UPDATE based on the entity's ID.
🗑️ Deleting a Student
Deleting is also straightforward.
First,
find the student.
Optional<Student> student =
        studentRepository.findById(id);
If it exists,
delete it.
studentRepository.delete(student.get());
Spring Boot generates
DELETE
FROM student
WHERE id=?
In your project, you've also explored Soft Delete, where the record isn't removed permanently but is marked as deleted.
This approach is commonly used in real-world applications because it allows data recovery and auditing.
🔄 Complete CRUD Flow
Here's how a typical request moves through the application.
HTTP Request

      │

      ▼

Controller

      │

      ▼

Service

      │

      ▼

Repository

      │

      ▼

Hibernate

      │

      ▼

MySQL Database

      │

      ▼

JSON Response
Every layer has a clear responsibility.
💡 Why This Design Matters
Imagine adding features like:
- Email notifications
- Validation
- Payment integration
- Logging
- Security
With a proper Service layer, these features can be added without making the Controller complicated.
That's why almost every professional Spring Boot project follows this architecture.
📚 Key Takeaways
✅ The Service layer contains business logic.
✅ Controllers should remain thin and only handle HTTP requests.
✅ Repository performs database operations.
✅ save() works for both insert and update.
✅ findById() returns an Optional.
✅ Clean architecture makes applications easier to maintain.
🚀 What's Next?
Now that we've built the backend logic, it's time to expose it through REST APIs.
In the next part, we'll explore the Controller layer, understand annotations like @RestController, @RequestMapping, @GetMapping, @PostMapping, and build all CRUD endpoints step by step.
🌐 Understanding the Controller Layer in Spring Boot
Until now, we have learned about:
- Entity
- Repository
- Service
Now it's time to understand the Controller, which is responsible for handling HTTP requests.
Think of the Controller as the main entrance of your application.
Whenever a client (such as Postman, a React application, or a mobile app) sends an HTTP request, the request first reaches the Controller.
The Controller receives the request, calls the appropriate Service method, and finally returns a response to the client.
🏗️ Where Does Controller Fit?
Let's understand the complete flow.
Client (Postman / Frontend)

          │

          ▼

StudentController

          │

          ▼

StudentService

          │

          ▼

StudentRepository

          │

          ▼

MySQL Database
Notice that the Controller never communicates directly with the database.
Its only responsibility is handling HTTP requests and responses.
📌 Creating the Controller
My controller looks like this:
@RestController
@RequestMapping("/api/students")
public class StudentController {

    private final StudentService studentService;

    public StudentController(StudentService studentService) {
        this.studentService = studentService;
    }

}
Let's understand every part.
📌 @RestController
@RestController
This annotation tells Spring Boot that this class is a REST Controller.
Whenever a method returns data,
Spring Boot automatically converts it into JSON.
Example
Student student = new Student();
becomes
{
    "id":1,
    "name":"John",
    "email":"john@gmail.com"
}
without writing any conversion code.
📌 @RequestMapping
@RequestMapping("/api/students")
This is the base URL of our controller.
Instead of writing
@PostMapping("/api/students/create")
every time,
we write
@RequestMapping("/api/students")
once,
then every endpoint automatically starts with
/api/students
For example
@PostMapping("/create")
becomes
POST /api/students/create
📌 Constructor Injection
private final StudentService studentService;

public StudentController(StudentService studentService){

    this.studentService = studentService;

}
The Controller needs the Service object.
Spring Boot automatically creates it and injects it through the constructor.
This is called
Constructor Dependency Injection.
🚀 Creating a Student
Let's look at the Create API.
@PostMapping("/create")
public ResponseEntity<Student> createStudent(
        @RequestBody Student student){

    Student createdStudent =
            studentService.createStudent(student);

    return ResponseEntity
            .status(HttpStatus.CREATED)
            .body(createdStudent);

}
What is @PostMapping?
@PostMapping("/create")
This tells Spring Boot,
"When a POST request comes to
/api/students/create
execute this method."
What is @RequestBody?
@RequestBody Student student
The JSON received from Postman
{
   "name":"Satyajit",
   "email":"abc@gmail.com"
}
is automatically converted into
Student student
This process is called
JSON Deserialization.
Why ResponseEntity?
Instead of returning only data,
I returned
ResponseEntity<Student>
Why?
Because ResponseEntity allows us to send
- Response Body
- HTTP Status Code
- Headers
all together.
Example
return ResponseEntity
.status(HttpStatus.CREATED)
.body(createdStudent);
returns
Status Code
201 Created
along with the Student object.
📖 Getting a Student by ID
@GetMapping("/get/{id}")
public ResponseEntity<Student>
getStudent(@PathVariable Long id){

    Student student =
            studentService.getStudent(id);

    if(student != null){

        return ResponseEntity.ok(student);

    }

    return ResponseEntity.notFound().build();

}
What is @GetMapping?
@GetMapping
handles HTTP GET requests.
Example
GET /api/students/get/1
What is @PathVariable?
Suppose the URL is
/api/students/get/5
Spring Boot automatically extracts
5
and stores it in
Long id
This is called
@PathVariable
📚 Getting All Students
@GetMapping("/get")
public ResponseEntity<List<Student>>
getStudents(){

    List<Student> students =
            studentService.getAllStudents();

    return ResponseEntity.ok(students);

}
This endpoint returns
GET /api/students/get
The response is
[
   {
      "id":1,
      "name":"John"
   },
   {
      "id":2,
      "name":"David"
   }
]
✏️ Updating a Student
@PutMapping("/update/{id}")
public ResponseEntity<Student>
updateStudent(
        @PathVariable Long id,
        @RequestBody Student student){

    Student updatedStudent =
            studentService.updateStudent(id,student);

    return ResponseEntity.ok(updatedStudent);

}
PUT is used whenever we want to modify existing data.
Example
PUT /api/students/update/2
🗑️ Deleting a Student
@DeleteMapping("/delete/{id}")
public ResponseEntity<String>
deleteStudent(@PathVariable Long id){

    String message =
            studentService.deleteStudent(id);

    return ResponseEntity.ok(message);

}
This endpoint deletes
Student ID = 2
The response
Student Deleted Successfully
📬 CRUD Endpoints
| HTTP Method | Endpoint | Description |
|---|---|---|
| POST | /api/students/create |
Create Student |
| GET | /api/students/get |
Get All Students |
| GET | /api/students/get/{id} |
Get Student by ID |
| PUT | /api/students/update/{id} |
Update Student |
| DELETE | /api/students/delete/{id} |
Delete Student |
🌐 HTTP Status Codes Used
| Status | Meaning |
|---|---|
| 200 OK | Request Successful |
| 201 Created | Resource Created |
| 404 Not Found | Student Not Found |
Using proper HTTP status codes makes our API more professional and easier for frontend developers to understand.
💡 Key Takeaways
✅ Controller receives HTTP requests.
✅ @RestController returns JSON automatically.
✅ @RequestMapping defines the base URL.
✅ @PostMapping, @GetMapping, @PutMapping, and @DeleteMapping handle different HTTP methods.
✅ @RequestBody converts JSON into Java Objects.
✅ @PathVariable extracts values from the URL.
✅ ResponseEntity helps us return proper HTTP status codes and responses.
🚀 What's Next?
Now that our REST APIs are ready, it's time to test them using Postman.
In the next part, we'll send real HTTP requests, understand JSON request and response bodies, and verify that our CRUD operations are working correctly.
🧪 Testing REST APIs Using Postman
Building a REST API is only half the job.
The next step is to test whether our APIs are working correctly.
For this project, I used Postman, one of the most popular API testing tools used by developers.
Postman allows us to send HTTP requests without building a frontend application.
Instead of creating a React or Angular UI first, we can directly test our backend APIs.
🚀 Why Use Postman?
Imagine you've built a backend application.
How do you know if your API is actually working?
You have two options:
- Build a frontend (time-consuming)
- Test the API directly
Postman makes testing quick and simple.
With Postman, we can:
- Send HTTP Requests
- View JSON Responses
- Check Status Codes
- Test CRUD Operations
- Debug APIs
That's why almost every backend developer uses it.
📌 Base URL
All APIs in my project start with:
http://localhost:8080/api/students
Since I used
@RequestMapping("/api/students")
inside the Controller, every endpoint begins with this base URL.
🟢 Create Student (POST)
The first API is used to create a new student.
Endpoint
POST /api/students/create
Complete URL
http://localhost:8080/api/students/create
Request Body
{
    "name":"Satyajit Mishra",
    "email":"satyajit@gmail.com",
    "course":"Computer Science"
}
What Happens?
- Postman sends a POST request.
- The Controller receives the request.
- The Service processes the data.
- Repository saves it into MySQL.
- Spring Boot returns the newly created student.
Expected Response
{
    "id":1,
    "name":"Satyajit Mishra",
    "email":"satyajit@gmail.com",
    "course":"Computer Science"
}
HTTP Status
201 Created
📸 Insert your POST API Postman screenshot here.
🔵 Get All Students (GET)
This endpoint retrieves every student from the database.
Endpoint
GET /api/students/get
Complete URL
http://localhost:8080/api/students/get
What Happens?
- Controller receives the request.
- Service asks Repository for all students.
- Repository executes:
SELECT *
FROM student;
- Spring Boot converts the result into JSON.
Response
[
   {
      "id":1,
      "name":"Satyajit"
   },
   {
      "id":2,
      "name":"Rahul"
   }
]
HTTP Status
200 OK
📸 Insert your GET (All Students) Postman screenshot here.
🟡 Get Student By ID
Sometimes we only need a single student.
For that, we use Path Variables.
Endpoint
GET /api/students/get/1
What Happens?
The Controller extracts
1
using
@PathVariable
The Service searches for that student.
If found,
it returns the student.
Otherwise,
it returns
404 Not Found
Response
{
   "id":1,
   "name":"Satyajit",
   "email":"satyajit@gmail.com"
}
HTTP Status
200 OK
📸 Insert your GET by ID screenshot here.
🟠 Update Student
Updating existing data is very common.
For example,
a student changes their email.
Instead of creating another record,
we update the existing one.
Endpoint
PUT /api/students/update/1
Request Body
{
    "name":"Satyajit Mishra",
    "email":"newemail@gmail.com"
}
What Happens?
- Controller receives request.
- Service checks if the student exists.
- Repository updates the record.
- MySQL stores the latest data.
Response
{
    "id":1,
    "name":"Satyajit Mishra",
    "email":"newemail@gmail.com"
}
HTTP Status
200 OK
📸 Insert your PUT API screenshot here.
🔴 Delete Student
Deleting a student is straightforward.
Endpoint
DELETE /api/students/delete/1
What Happens?
- Controller receives DELETE request.
- Service checks if the student exists.
- Repository deletes the record.
- Response is returned.
Response
Student Deleted Successfully
HTTP Status
200 OK
📸 Insert your DELETE API screenshot here.
📊 CRUD Flow Using Postman
POSTMAN

      │

      ▼

Controller

      │

      ▼

Service

      │

      ▼

Repository

      │

      ▼

MySQL Database

      │

      ▼

JSON Response
Every request follows the same journey.
The only difference is the HTTP method.
📌 Common HTTP Methods
| Method | Purpose |
|---|---|
| GET | Read Data |
| POST | Create Data |
| PUT | Update Data |
| DELETE | Delete Data |
These four methods form the foundation of most REST APIs.
💡 What I Learned
Testing with Postman helped me understand much more than simply writing code.
I learned how HTTP requests are sent, how JSON data is exchanged, how different HTTP methods work, and how important status codes are for communication between the backend and frontend.
More importantly, I gained confidence that my APIs were working correctly before integrating them with any frontend application.
🚀 What's Next?
So far, we've built a complete CRUD REST API and tested every endpoint using Postman.
In the next part, I'll explain Hard Delete vs Soft Delete, why real-world applications rarely delete data permanently, and how I implemented both approaches in my Spring Boot project.
🗑️ Hard Delete vs Soft Delete in Spring Boot
Until now, we've learned how to create, read, update, and delete data.
But have you ever wondered what actually happens when we delete a record from the database?
Does it disappear forever?
The answer depends on how we delete it.
There are two common approaches:
- Hard Delete
- Soft Delete
Let's understand both with simple examples.
🤔 What is Hard Delete?
Hard Delete means removing the data permanently from the database.
For example,
Suppose our Student table contains:
| ID | Name | |
|---|---|---|
| 1 | Rahul | rahul@gmail.com |
| 2 | Satyajit | satyajit@gmail.com |
Now if we execute
DELETE FROM student WHERE id = 2;
The table becomes
| ID | Name | |
|---|---|---|
| 1 | Rahul | rahul@gmail.com |
Student Satyajit is completely removed.
There is no way to recover the record unless we have a backup.
This is called Hard Delete.
⚠️ Problems with Hard Delete
Although Hard Delete is simple, it has some disadvantages.
Imagine an e-commerce application.
A customer deletes their account.
Should all their orders, invoices, payment history, and shipping records disappear forever?
Probably not.
Similarly,
Imagine a hospital management system.
Deleting patient records permanently could create legal and auditing issues.
That's why many real-world applications avoid Hard Delete.
🤔 What is Soft Delete?
Soft Delete does not remove the record from the database.
Instead,
it simply marks the record as deleted.
The record still exists,
but users cannot see it.
📌 How Soft Delete Works
We add a new column to our table.
isDeleted
Initially,
every record looks like this.
| ID | Name | isDeleted |
|---|---|---|
| 1 | Rahul | false |
| 2 | Satyajit | false |
Now suppose we delete Student ID = 2.
Instead of deleting,
Spring Boot updates the value.
| ID | Name | isDeleted |
|---|---|---|
| 1 | Rahul | false |
| 2 | Satyajit | true |
Notice something interesting.
The record is still present.
Only the flag changed.
📌 Updating the Entity
To implement Soft Delete,
we simply add a new field.
private boolean isDeleted = false;
Now every new student is automatically marked as
false
meaning
"Active Student"
📌 Updating Delete Logic
Instead of
studentRepository.delete(student);
we write
student.setDeleted(true);

studentRepository.save(student);
This updates the record instead of removing it.
Generated SQL
UPDATE student
SET is_deleted = true
WHERE id = ?;
Much safer than deleting permanently.
📌 Fetching Only Active Students
Now another problem appears.
If every record still exists,
how do we hide deleted students?
Spring Data JPA makes this easy.
Inside Repository,
we create
List<Student> findAllByIsDeletedFalse();
That's all.
No SQL required.
Spring Boot automatically generates
SELECT *
FROM student
WHERE is_deleted = false;
This is one of my favorite features of Spring Data JPA.
🤯 How Does Spring Understand This Method?
Many beginners find this confusing.
Let's break it down.
findAllByIsDeletedFalse()
Spring reads the method name.
findAll

↓

By

↓

IsDeleted

↓

False
and automatically generates the SQL query.
This feature is called
Query Method Creation.
No SQL.
No implementation.
Just a method name.
🏢 Why Companies Prefer Soft Delete
Soft Delete is widely used in production applications.
Some examples include:
🛒 E-commerce
Products can be hidden instead of deleted.
🏦 Banking
Transactions should never be permanently deleted.
🏥 Hospital Management
Patient records must remain available for legal purposes.
🎓 Student Management
Deleted students can be restored later if needed.
👨💼 HR Systems
Former employee records are usually archived instead of removed.
🔄 Hard Delete vs Soft Delete
| Hard Delete | Soft Delete |
|---|---|
| Removes data permanently | Keeps data in database |
| Cannot recover easily | Can restore later |
| Uses DELETE query | Uses UPDATE query |
| Faster | Slightly slower |
| Less storage | More storage |
| Suitable for temporary data | Suitable for production systems |
💡 Which One Should We Use?
It depends on the application.
If the data is temporary,
Hard Delete is perfectly fine.
But if the application needs
- Audit Logs
- History
- Data Recovery
- Legal Compliance
- Reporting
Soft Delete is the better choice.
That's why most enterprise applications prefer Soft Delete.
📚 What I Learned
While building this project,
I realized that deleting data is not always as simple as calling
delete()
Understanding the difference between Hard Delete and Soft Delete helped me think beyond basic CRUD operations and gave me insight into how real-world backend applications handle important data.
🎯 Key Takeaways
✅ Hard Delete permanently removes data.
✅ Soft Delete keeps data by marking it as deleted.
✅ Spring Data JPA can automatically generate query methods like
findAllByIsDeletedFalse()
✅ Soft Delete is commonly used in production applications.
✅ Enterprise applications rarely delete important data permanently.
🚀 Conclusion
Building this Student Management REST API has been one of the most valuable projects in my Spring Boot learning journey.
I didn't just learn how to perform CRUD operations—I also understood how Spring Boot, Spring Data JPA, MySQL, and REST APIs work together in a real backend application.
More importantly, I learned the importance of writing clean, layered code using the Controller → Service → Repository architecture and explored practical concepts like Soft Delete, which are commonly used in production systems.
This project is just one milestone in my journey.
Next, I'll continue learning and building with:
- Spring Security & JWT Authentication
- Bean Validation
- Global Exception Handling
- Swagger / OpenAPI
- Docker
- AWS Deployment
Thank you for reading! 🙌
If you're also learning Spring Boot, I hope this article helped you understand the concepts more clearly.
Feel free to share your thoughts, suggestions, or questions in the comments.
Happy Coding! 🚀
🚧 Challenges I Faced While Building This Project
Every project comes with challenges, and this one was no exception.
Instead of everything working perfectly on the first try, I made mistakes, faced errors, and spent time debugging them.
Looking back, those challenges taught me much more than simply following a tutorial.
Here are some of the problems I encountered and what I learned from them.
1️⃣ MySQL Connection Issues
When I first tried running the application, Spring Boot failed to connect to MySQL.
The application wouldn't start, and I saw a long stack trace in the console.
After checking my configuration, I realized the issue was in my application.properties file.
I had either entered the wrong database name or incorrect database credentials.
After fixing the configuration, Spring Boot connected successfully.
Lesson Learned
Always verify:
- Database name
- Username
- Password
- MySQL server status
- Port number
2️⃣ Understanding ResponseEntity
Initially, I returned objects directly from my Controller.
return student;
Although it worked, I later learned that using ResponseEntity is a better approach.
It allows us to return:
- Response Body
- HTTP Status Code
- Headers
Example:
return ResponseEntity
        .status(HttpStatus.CREATED)
        .body(student);
This makes the API more professional and easier for frontend developers to understand.
Lesson Learned
Always return meaningful HTTP status codes instead of returning only data.
3️⃣ Optional Confused Me
One concept that confused me in the beginning was Optional.
When I wrote:
studentRepository.findById(id);
I expected it to return a Student object.
Instead, it returned:
Optional<Student>
After learning why Optional exists, everything became much clearer.
It helps prevent NullPointerException and forces us to check whether data exists before using it.
Lesson Learned
Never assume data exists in the database.
Always handle missing data properly.
4️⃣ Update API Logic
At first, I tried updating a student without checking whether the record existed.
Later, I realized that the correct approach is:
- Find the student.
- Check if it exists.
- Update only the required fields.
- Save the updated object.
This prevents unexpected errors and makes the API more reliable.
Lesson Learned
Validation is just as important as writing the CRUD logic.
5️⃣ Hard Delete vs Soft Delete
Initially, I thought deleting a record simply meant removing it from the database.
While learning Spring Boot, I discovered the concept of Soft Delete, where records are marked as deleted instead of being removed permanently.
This gave me a better understanding of how enterprise applications manage important data.
Lesson Learned
Real-world applications often prefer Soft Delete over Hard Delete because it allows data recovery and auditing.
🌱 What This Project Taught Me
This project wasn't just about CRUD operations.
It helped me understand how a real Spring Boot backend application is organized.
Some of the key concepts I learned include:
- Layered Architecture
- REST API Development
- Spring Data JPA
- Entity Mapping
- Dependency Injection
- HTTP Status Codes
- Postman API Testing
- MySQL Integration
- Clean Code Structure
More importantly, I learned how different components work together to process a request from start to finish.
🚀 My Next Learning Goals
Learning never stops.
My next goal is to build more advanced Spring Boot projects by exploring:
- Spring Security
- JWT Authentication
- Bean Validation
- Global Exception Handling
- Swagger / OpenAPI
- Docker
- AWS Deployment
- Microservices
I also plan to continue documenting my learning journey by sharing practical projects and articles.
❤️ Final Thoughts
This Student Management REST API is one of the first backend projects I've built while learning Spring Boot.
Although it's a beginner-level project, it helped me build a strong foundation in backend development.
If you're also starting your Spring Boot journey, my advice is simple:
👉 Don't just watch tutorials.
Build projects.
Break things.
Fix them.
That's where real learning happens.
Thank you for reading!
If you found this article helpful, feel free to connect with me and follow my Spring Boot learning journey.
Happy Coding! 🚀